An Introduction to Veterinary Radiography
Dental radiographs are essential for the proper diagnosis of oral pathology in our dog and cat patients.
By Denise Rollings, AAS, CVT, VTS (Dentistry), Key Account Manager, iM3 USA | 2025
Many oral and dental diseases cause inflammation and discomfort for our patients, even if they do show outward signs. Most of the pathology is below the gingival margin, making it difficult or impossible to see on an oral examination alone.
Types of Intraoral Radiography Equipment
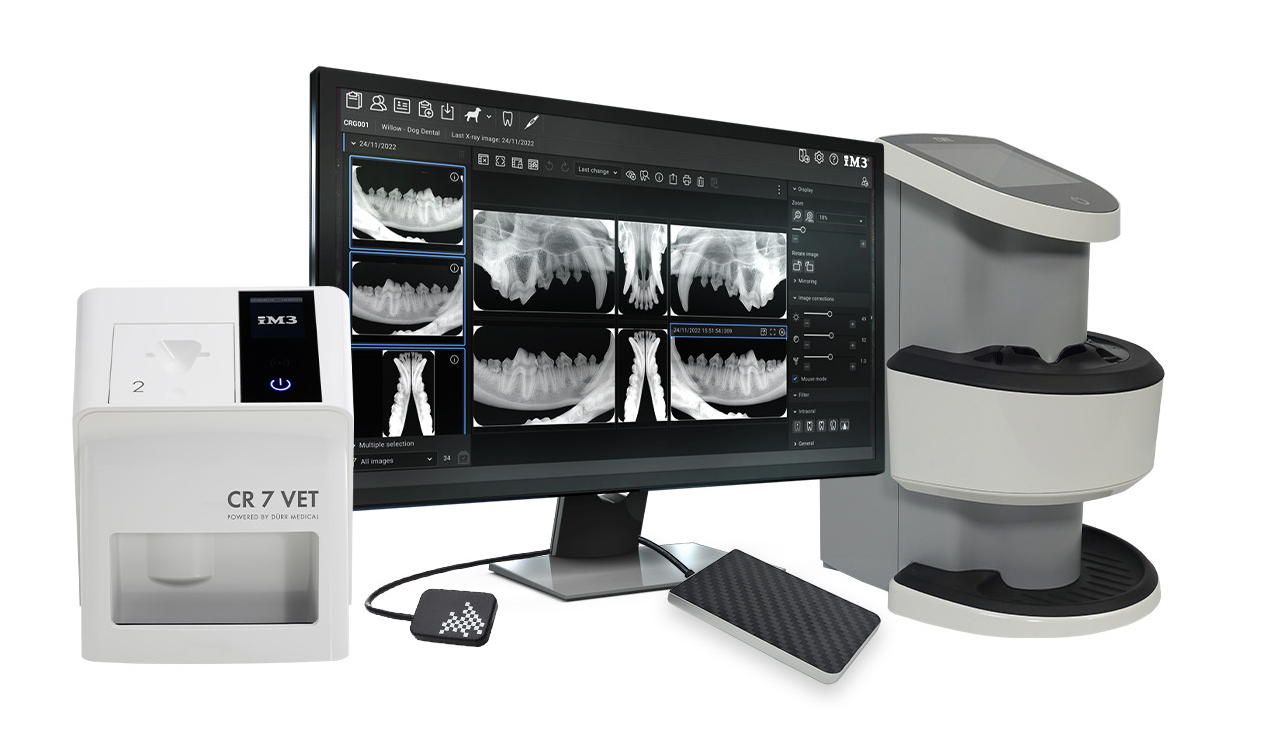
There are three main types of intraoral radiography systems used in veterinary dentistry: standard dental X-ray film with a chairside developer darkroom, direct digital imaging (DR), and indirect or computed digital imaging (CR). Each system requires a generator to produce the radiation needed for exposure, sending a precise amount to the tube head.
The X-Ray Generator Tube Head & Technical Adjustments
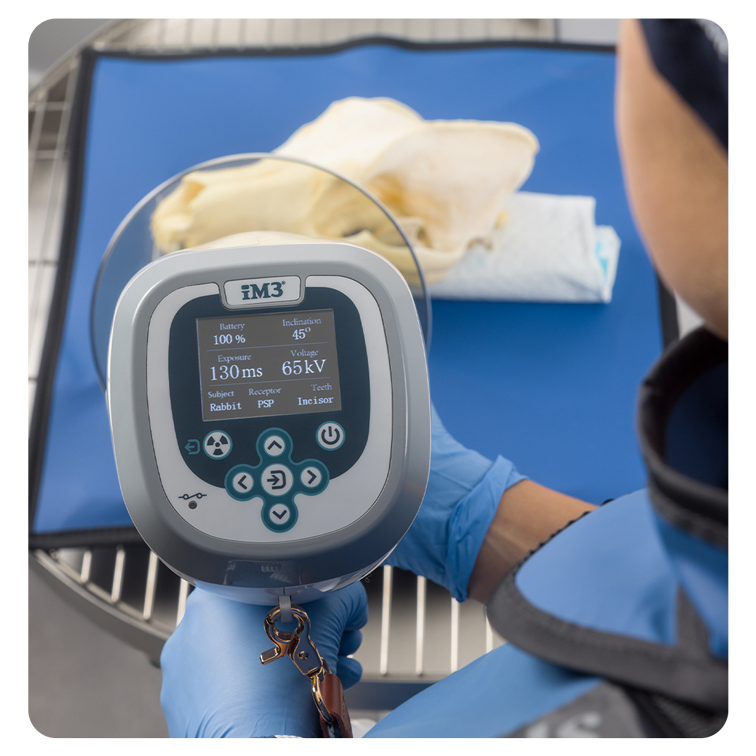
The tube head is the position-indicating device (PID) and may also be called the “cone.” The PID is what is aimed at the area of the mouth to be imaged. The exposure time, voltage (kVp), and milliamperage (mA) may be adjustable depending on the generator using the control panel.
The control panel has preset settings based on the size of the patient and the area of the mouth being imaged to help produce the best exposure for that image.
Different Types of Generators
Generators may be mounted on stands (trolley), walls, or be handheld. A wall or ceiling-mounted system requires that the station where the dental radiographs will be obtained is within reach. The trolley-mounted system may be moved to different stations. The use of a trolley system may be prohibited by the floor space of a clinic. A handheld generator needs the least amount of space and may be moved to different stations for use. State laws vary regarding generator use and must be followed.
Dental X-ray Films
Dental X-ray films are much less common today but are still (rarely) in use. In this method, the film is placed into a protective cover and, after exposure, is developed in a small chairside developer using chemicals. This process can take several minutes, and the resulting image is evaluated using a light source behind the film. While familiar to some practitioners, the system is slow and requires chemical maintenance.
Direct Digital Imaging (DR)
Direct digital imaging (DR) uses a hard sensor connected to a laptop or generator via a cord. The sensors typically come in sizes 0, 1 and 2, with size 2 being the most common. A few companies, such as iM3, offer a size 4, and a size 6 digital sensor. Due to the high cost of sensors, most facilities only purchase one size. Once exposed, the image is transferred to the computer and viewable within seconds. DR systems are the fastest and require the least radiation, but they may be limited to a size 2 sensor, meaning larger patients require multiple images for a single tooth or larger area of the mouth unless a size 4 or 6 digital sensor is used.
Indirect or computed digital imaging (CR)
Indirect or computed digital imaging (CR) uses reusable phosphor plates, which are available in sizes 0 through 6, depending on the manufacturer. The plate is placed in a protective sheath before positioning in the patient’s mouth. After exposure, the sheath is removed, and the plate is inserted into a scanner. The scanner converts the data into a digital image, erases the plate, and allows it to be reused.
This system can develop an image in as fast as 6 to 8 seconds depending on the manufacturers and settings. A CR system requires a supply of protective sheaths. CR plates are thin, flexible and available in larger sizes, making them comfortable for patients and offers the ability to obtain full mouth radiographs on a large-breed dog patient in as few as six images.
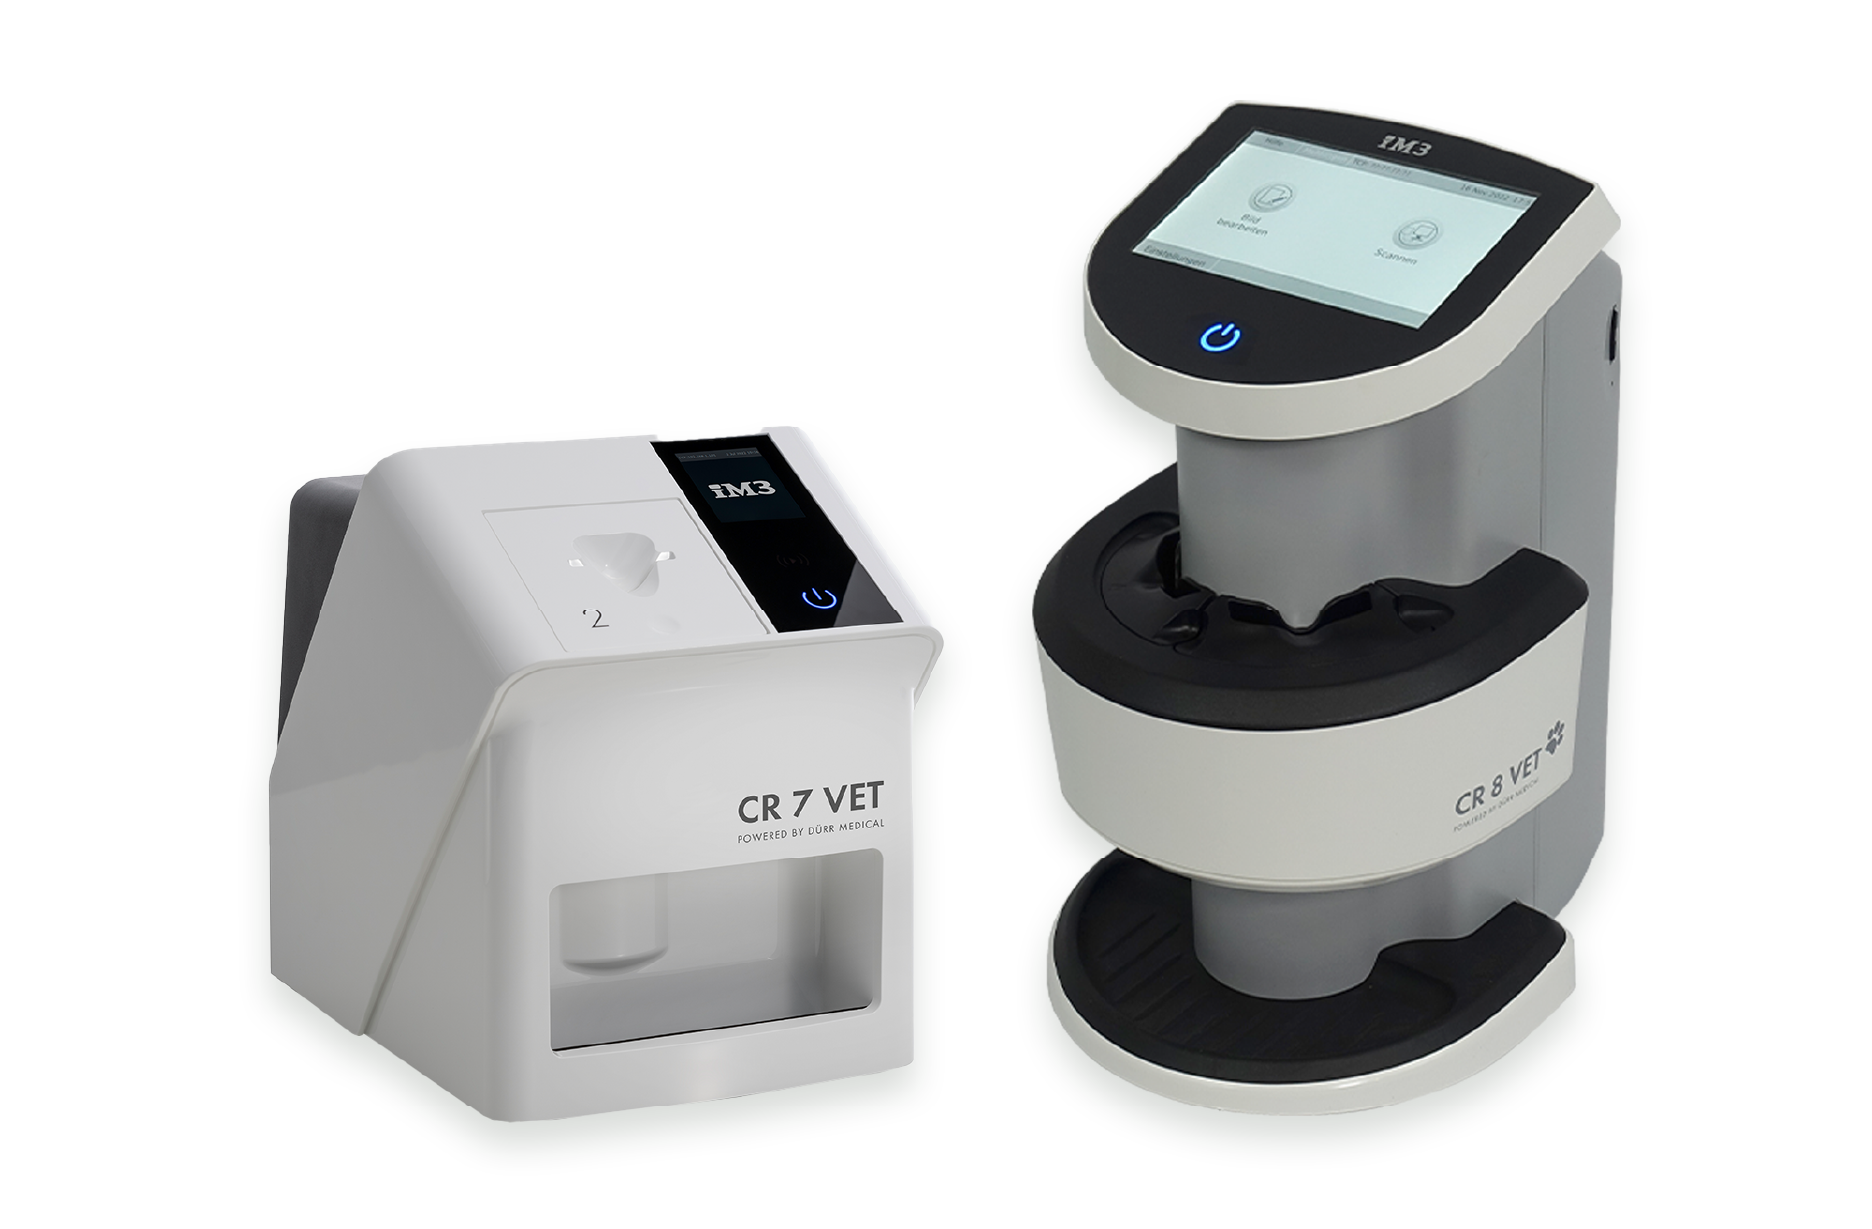
The iM3 CR 7 2.0 (left) processes one phosphor plate at a time, while the iM3 CR 8 (right) processes two simultaneously to help save time.
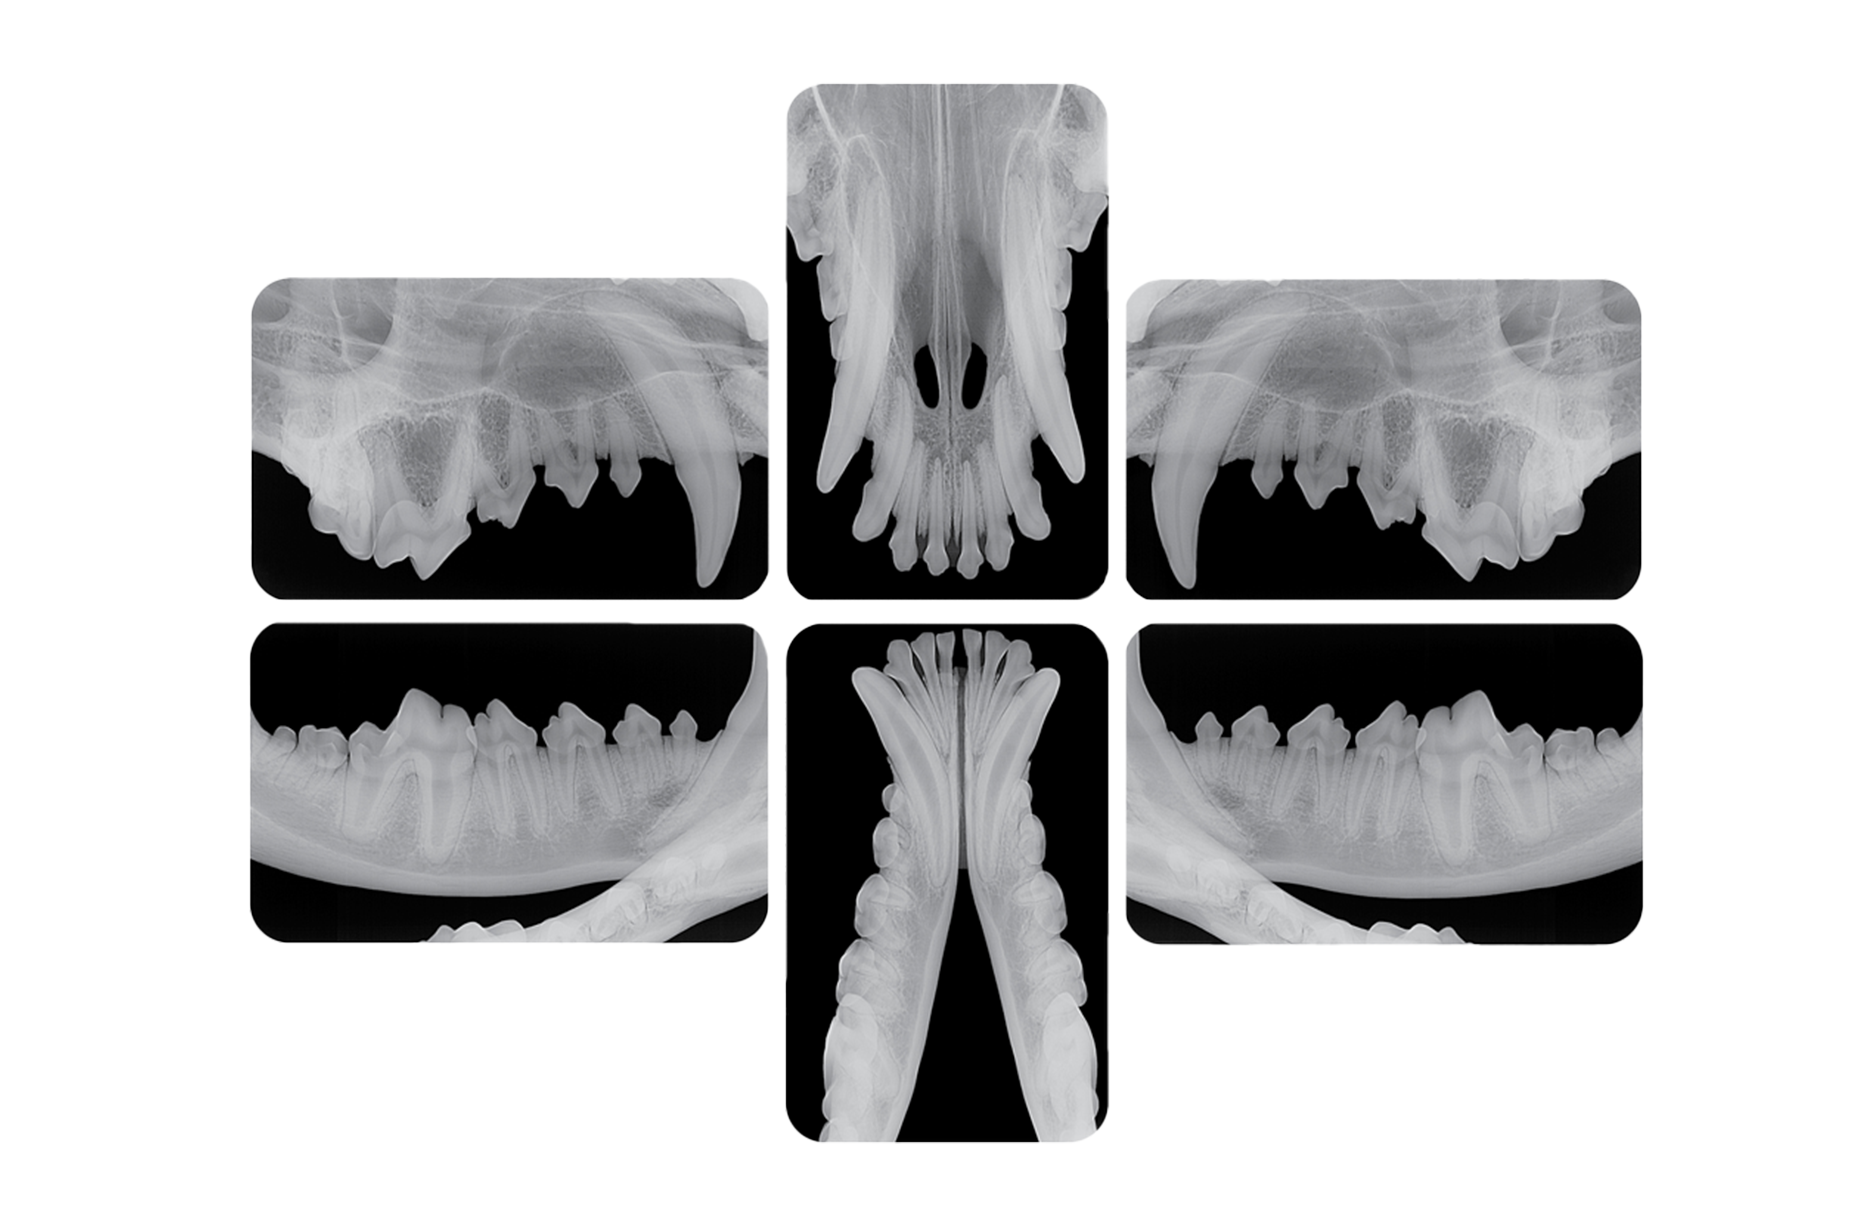
full-mouth dental X-Ray images taken on a large dog using a size 5 CR plate.

Dental Imaging Software
Both DR and CR systems work with dental imaging software that allows the user to adjust brightness, contrast, rotation, inversion and magnification. Areas of the radiograph may also be circled, and pathology may be pointed out to the patient’s owner.
Most dental radiograph software systems allow the user to use full-mouth templates. These templates are preset with the order in which the user would like to obtain their dental radiographs and reduce the amount of computer time needed. These systems vary in cost, upkeep and features. It is important to research each system’s cost, maintenance needs, technical support, warranties and training options before a purchase is made.
Why Radiograph Teeth?
Dental radiographs are an essential part of a comprehensive oral examination. Full-mouth radiographs should be obtained for every dental patient, as most of a tooth’s structure lies below the gumline and cannot be assessed visually. Radiographs are critical for accurate evaluation, diagnosis, treatment planning and monitoring of pathology.
In human dentistry, patients can localize discomfort and undergo pulp testing, but veterinary patients require general anesthesia and cannot communicate pain, requiring a comprehensive oral examination and full-mouth radiographs.
Client education plays a significant role in gaining acceptance for dental radiographs. Human dentists have already educated their patients on their importance, but pet owners often require more explanation.
Using visual aids such as case examples, photographs, textbooks and before-and-after radiographs can help demonstrate the value of imaging. Many practices now include full-mouth radiographs with their dental procedures and do not make it an option, as it is mandatory.
Diagnostic Criteria
To be considered a diagnostic dental radiograph, a dental radiograph must show every part of the tooth not visible to the naked eye. There must be at least 2 to 3 mm of bone visible around the apex of the tooth root and the alveolar margin on each side. Images should have minimal elongation and foreshortening, and exposure should be appropriate — not too light or too dark. Some clinicians prefer to include the tooth crown, but this is a matter of personal preference.
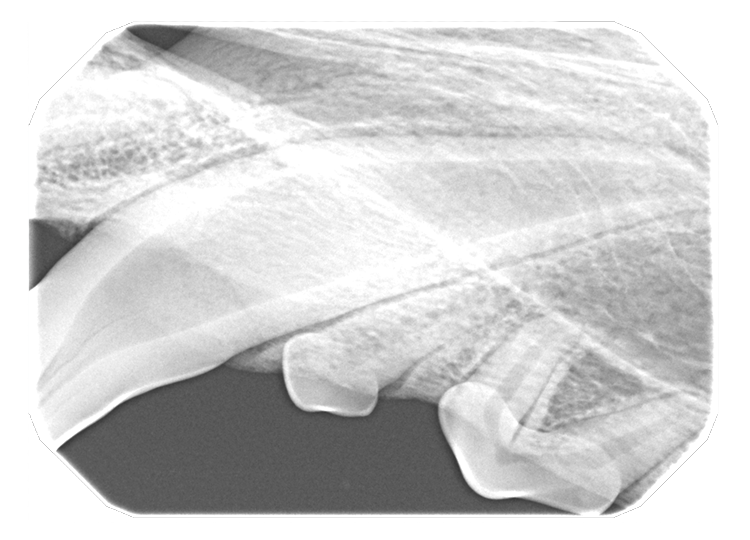
At least 2 to 3 mm of bone not visible around the apex of the tooth root. low exposure.
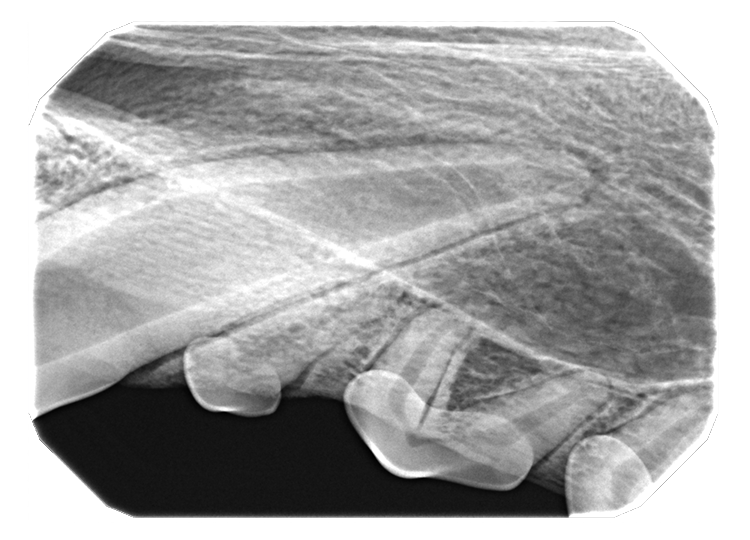
Alveolar bone visible around the apex of the tooth root. Appropriate exposure.
Radiographic Concept & Positioning
The Challenge of the Hard Palate
Dental radiographs on dogs and cats can be a challenge due to the hard palate. Humans have a high palatal vault, making the positioning of the sensor easier because the plate can be placed behind the teeth. Dogs and cats have a flat palatal vault, requiring the teeth to be placed on the plate and the use of angles to obtain the radiograph. This is called the bisecting angle technique. The only place we can place the sensor is directly behind the teeth in the caudal mandible. This is called the parallel technique, with the tube head aimed directly at the plate.
"Dogs and cats have a flat palatal vault, requiring the teeth to be placed on the plate and the use of angles to obtain the radiograph."
Think of the parallel technique like obtaining an abdominal radiograph of a dog. The dog is laying directly on the table and the beam is aimed directly at the dog. The parallel technique may sometimes be used for the mandibular incisor and canine teeth depending on the film placement and anatomy of the patient. The plate cannot be placed parallel to the teeth in the rostral mandible due to the mandibular symphysis, or anywhere on the maxilla due to the hard palate.
The Shadow Analogy
Think of the radiographic image as a shadow. We all remember playing with flashlights as kids. We can make the shadow long, we can make the shadow short, we can make the shadow move forward and we can make the shadow move backward. The same principle applies to dental radiographs. We are projecting a shadow of the teeth onto the plate in the mouth.
For example, think of spending the day at the beach. You are there to watch the sunrise. When the sun comes up in the morning, you have a long skinny shadow. As the morning goes on and the sun rises higher in the sky, you and your shadow are the same length. As noon approaches, when the sun is high above you, your shadow is short and stubby.
If you have an image that is long and skinny and the apex of the tooth root is missing, you've used too low of an angle, and you would need to increase the angle of the tube head if in sternal‑dorsal recumbency to shorten the image.
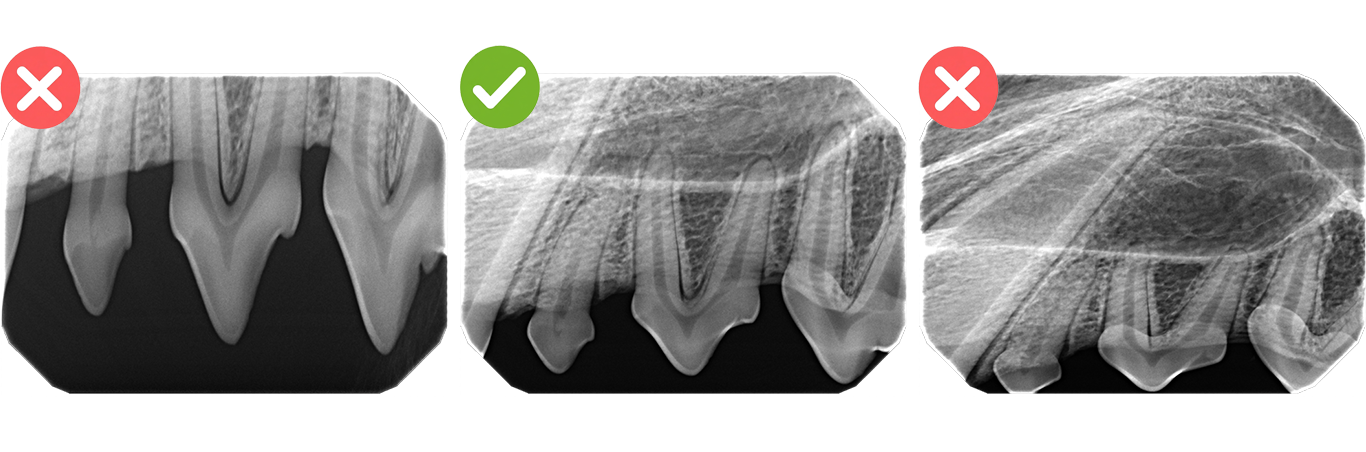
Beam angle directly affects the radiographic image accuracy. Low angle elongates, correct angle produces a diagnostic image, steep angle foreshortens.
Patient Positioning
This brings up the question of patient positioning. One can obtain dental radiographs in any position, whether it be sternal, dorsal or lateral recumbency. It is generally easiest to learn dental radiograph positioning sternal recumbency, and once the concepts, angles and corrections are understood, one can change recumbencies as needed or desired. When in sternal recumbency for maxillary radiographs, have the head level and the hard palate as parallel to the table as possible. The sensor, film, or plate should also be as level as possible.
When positioned this way, variables that complicate positioning are eliminated, saving precious anesthesia time. Along with obtaining diagnostic dental radiographs, we should obtain dental radiographs as quickly as possible instead of taking multiple retakes.
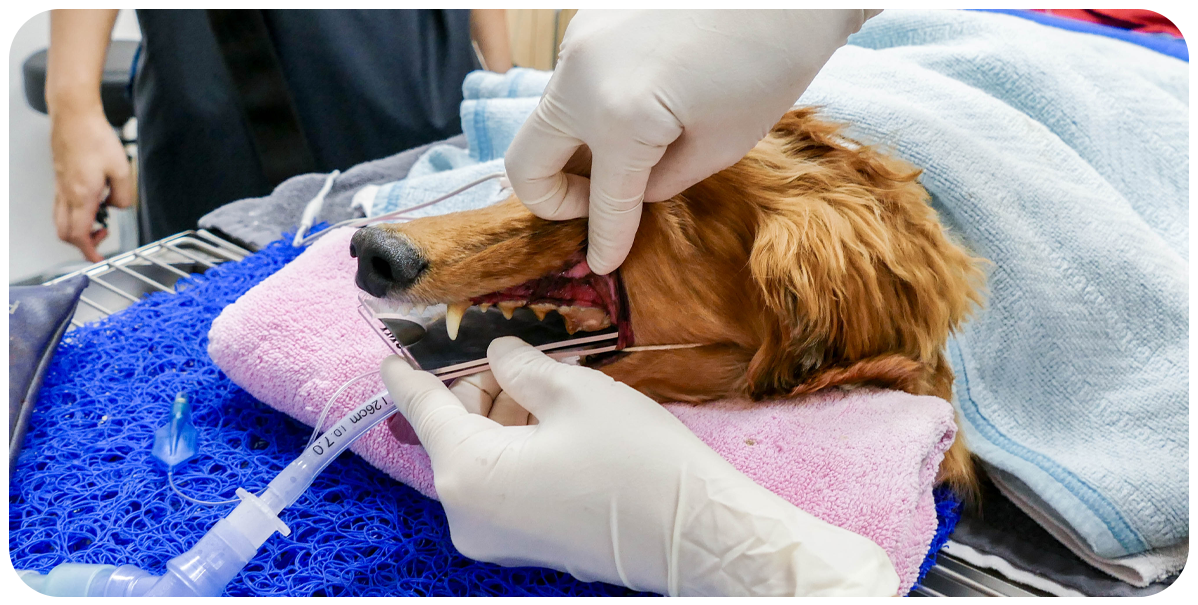
Patient positioned in sternal recumbency for maxillary radiographs using a size 5 CR plate with an iM3 plate protector.
After the maxillary images are obtained, the patient is turned to dorsal recumbency to obtain the mandibular images. Make sure the anesthesia tubing is disconnected from the patient and the head and airway are moved gently. The patient should be positioned so that the mandible is now parallel to the table and the sensor should be level as well.
When in lateral recumbency, the patient should be positioned so the nose is parallel to the table and the hard palate is perpendicular to the table. Depending on the tube head and table that is used, the patient's nose may have to be raised so the tube head can go where it needs to without hitting the table. Remember that the hard palate should still be perpendicular to the table.
Plate Placement & Tube Head
The plate should be in the mouth and not hang out of the mouth. The crown of the tooth should be at the edge of the plate. If the plate is hanging out of the mouth the image will not be projected onto the plate; instead, the X-ray will capture air. We can only obtain an image as large as the size of the plate. If the tooth or area being imaged is larger than the plate, multiple images will be necessary.
The tube can be close to the patient, even touching the patient, or a couple of inches away. When using a size 4,5, or 6 film or plate, backing the tube head away a few inches will help expose more of the plate. The tube head should be aiming at the tooth roots, not the table. Visualize the tooth roots between the tube head and the plate. Do not aim the tube head at the table or you will not expose the plate.
A dental radiograph can be thought of as a shadow. Just as the position of the sun changes the length of a shadow, the angle of the X-ray beam changes the appearance of the tooth in the image. A low beam angle results in an elongated (long and thin) image, while a high beam angle produces a foreshortened (short and stubby) image.
Dental Radiograph Positioning
Proper positioning is fundamental to acquiring clear and diagnostic images. For every view, the plate is in the mouth with the crowns placed right inside the flat surface of the plate. We do not want to radiograph air, so do not have the sensor visible outside the mouth except for a couple of millimeters. For the canine patient, maxillary images are obtained in sternal recumbency and mandibular images in dorsal recumbency.
Canine Tube Head Angles
Tube head angles for this approach include 60 degrees for maxillary incisors. For the maxillary canine teeth, the angle is 60 to 70 degrees with the tube head aiming from the side of the head, not from the front. If the tube head is aiming from the front, the image (shadow) will be projected back, and the apex may be off the plate.
The angle is 45 degrees for first through third premolars and 50 to 60 degrees for the fourth premolar and molars. Turn the plate sideways for the maxillary molars instead of going straight back into the mouth. This will provide better coverage because of the inward curve of the caudal maxilla. Mandibular incisors and canines require 70 degrees, the lateral canine view also requires 70 degrees, and first and second premolars at 45 to 55 degrees. The mandibular molars continue to use the parallel technique.
Feline Tube Head Angles
For feline patients, the maxillary incisors and canines are imaged at 45 to 60 degrees, cheek teeth at 30 to 40 degrees, mandibular incisors, and canines at 70 to 80 degrees (Image 2), and premolars at 50 to 60 degrees. Remember, mandibular molars are again imaged using parallel technique.
Troubleshooting
When evaluating a dental radiograph, it is crucial to assess the image against specific diagnostic criteria. The clinician should confirm the presence of 2 to 3 mm beyond the apex of the tooth, visibility of the alveolar bone on both sides of the tooth, proper tooth length and adequate exposure. If all these criteria are met, the image is considered diagnostic. If any criterion is not met, adjustments must be made.
Importantly, only one variable—sensor, film, plate position on the tube head, or angle—should be altered at a time to isolate the source of the error effectively.
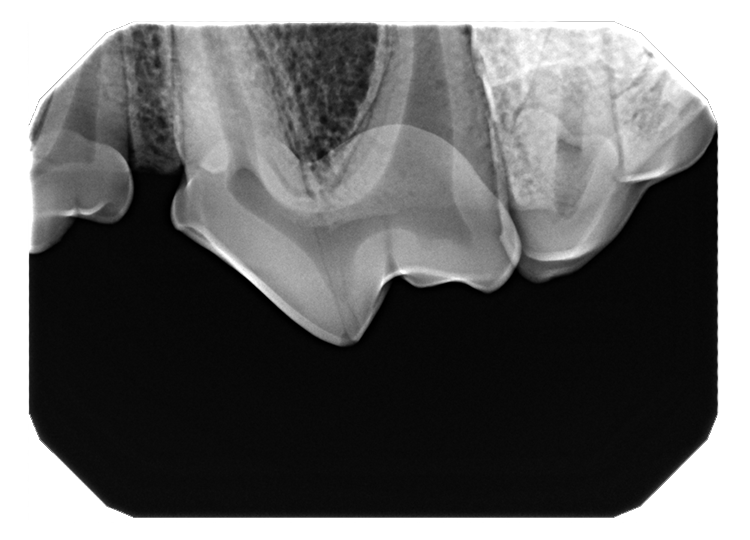
Incorrect sensor positioning: Part of the tooth is cut off, resulting in an incomplete image that makes diagnosis difficult or impossible.
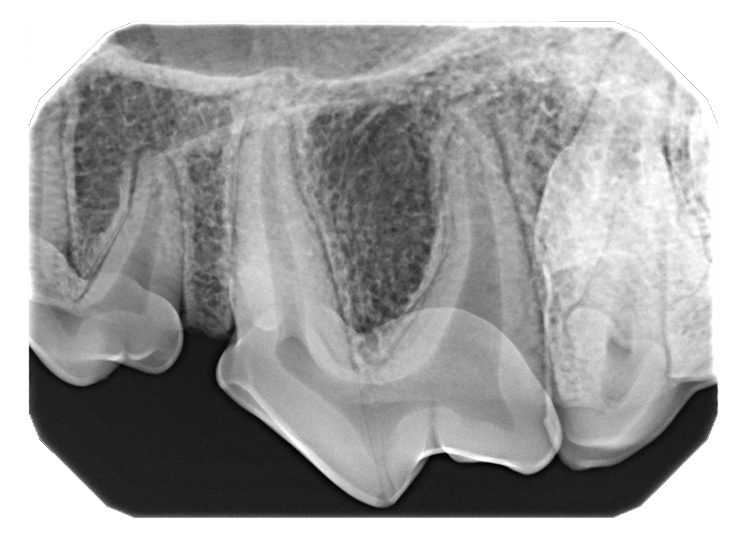
Corrected sensor positioning: A slight adjustment of the sensor position, without changing the X-ray beam angle, can make a significant difference in image diagnostic value.
Common Radiographic Errors
Common radiographic errors include foreshortening, elongation and cone cutting. Foreshortening results in a tooth appearing short and stubby, typically due to an excessively steep tube head angle. This can be corrected by decreasing the angle. Elongation, where the tooth appears long and thin and may be lacking at the apex, is caused by a low tube head angle and requires an increase in angle for correction.
Cone cutting presents as a white circular area on the image, indicating that the X-ray beam did not fully expose the sensor. To correct this, the tube head should be moved toward the area of cone cutting. When the tips of the tooth roots are missed on an image, increase the angle and reacquire the image.
Orienting Dental Radiographs
Once a radiograph is acquired, it must be correctly oriented for interpretation. While some digital systems automatically orient images, others do not. The standard orientation mimics viewing the patient face-to-face, as if lifting the lips of a patient who is facing the clinician. Understanding the anatomy of the skull, jaw and teeth is essential for identifying the structures in the radiograph.
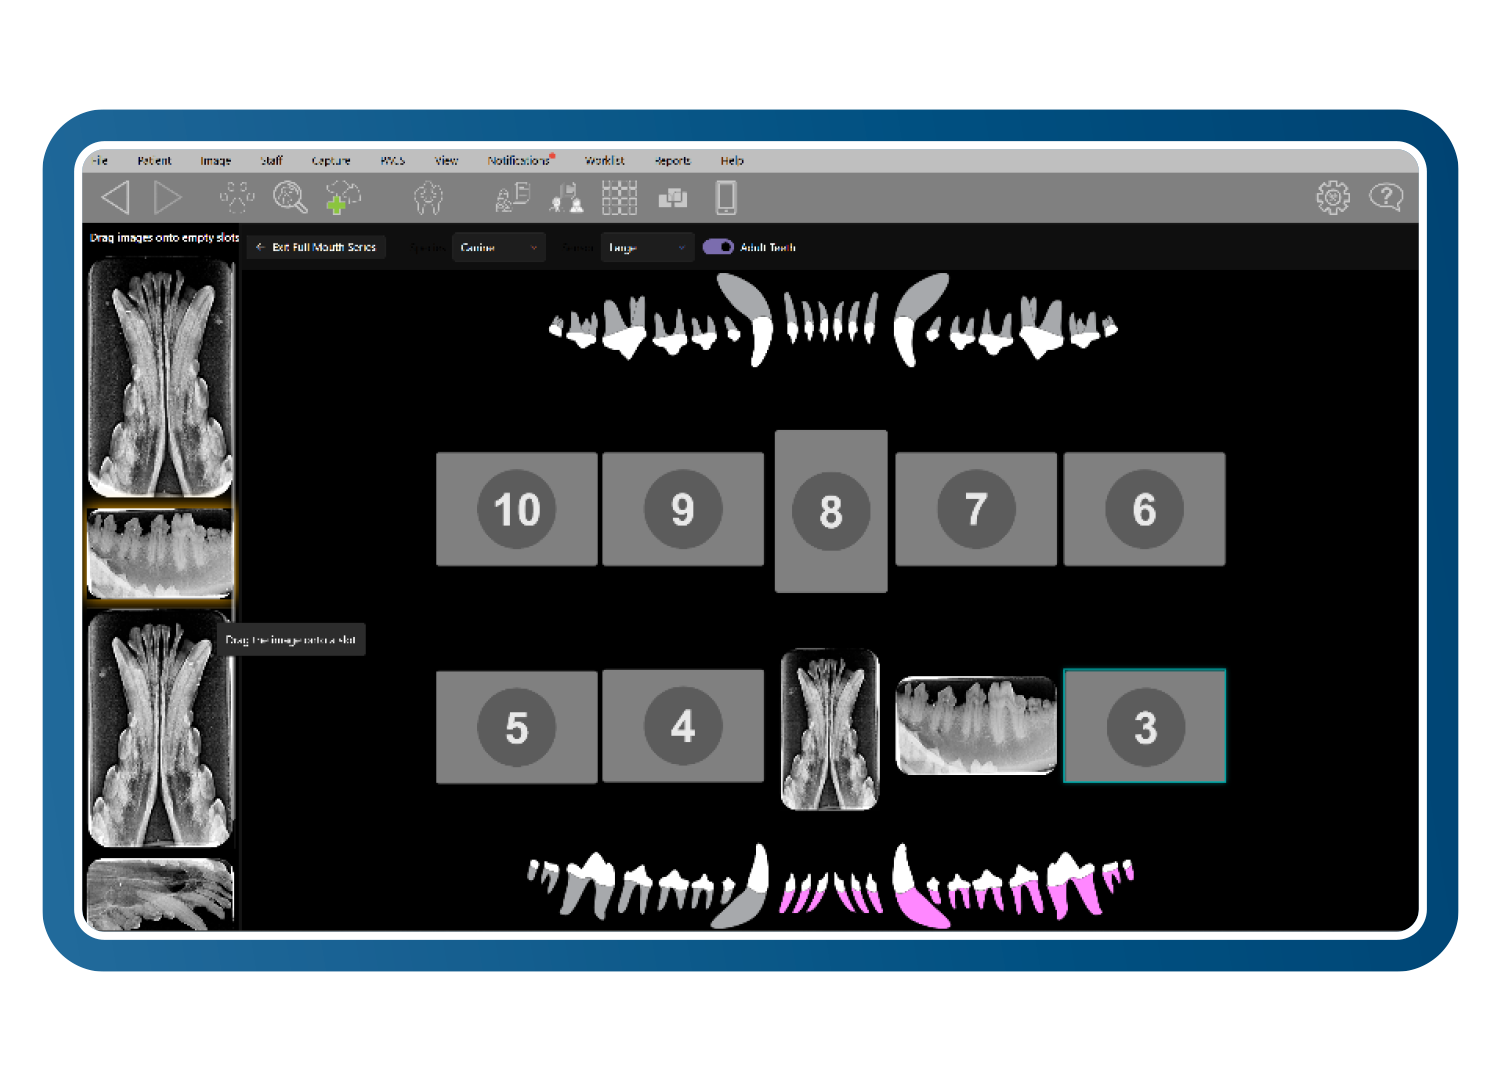
Maxillary Images
In maxillary images, the crowns of the teeth point downward and the roots upward. Key anatomical landmarks include the palatine fissures, which are symmetrical radiolucent structures near the maxillary incisors; the nasal surface of the alveolar process, a radiopaque line across the mid-root of the maxillary canine; and the conchal crest, a radiopaque line apical to the canine root apex. Recognition of tooth shapes and root numbers is also important, as only the maxilla typically contains three-rooted teeth, though anomalies can occur.
Mandibular Images
In mandibular images, the crowns point upward and the roots downward. Important landmarks include the mandibular symphysis, a radiolucent line between the central incisors; the mandibular canal, a uniform radiolucency within the bone; and the ventral cortex, a dense white bone at the bottom of the mandible. Familiarity with tooth shapes and root numbers is again essential, with the mandible typically lacking three-rooted teeth, although anomalies can occur.
To determine the side of the mouth being viewed, remember that the right side of the mouth appears on the left side of the image and vice versa. This orientation reflects the perspective of viewing a patient who is facing the clinician.
Conclusion
Mastery of dental radiography requires attention to detail, anatomical knowledge, and a systematic approach to troubleshooting, with the end goal of producing a diagnostic image the veterinarian can easily interpret and understand for the best patient diagnosis. By adhering to these principles, veterinary professionals can consistently produce diagnostic quality radiographs that support optimal patient care.